Intro to Locomotive Scroll

I am a developer from Nigeria, passionate about motion design and building out SASS products. I love to get developers to stretch their abilities once they've gotten a hang of the basics.
Introduction
This tutorial is a premier on using Locomotive Scroll to create fluid experiences on the web.
Smooth scrolling as is name suggests allows for a user to scroll smoothly. Locomotive Scroll is a library that provides smooth scrolling with support for parallax effects, toggling classes, and triggering event listeners when elements are in the viewport. You can check out their official demo here. We'd also be adding a little bit of GSAP.
The final result of what we would be building out could be found here
Ps: If you're viewing the live site on mobile, turn on Desktop site and view it in landscape mode
The Good Stuff
Let's get right into it. We would discuss the behavior of the web page a bit, then we would talk about the structure of it. The HTML file is broken down into sections and we'll be going through each of them alongside the JavaScript file.
Firstly let's load the files into the codepen
Locomotive Scroll CSS (This is needed for the scroll bar and a few other things to work)
Smooth Scrolling Behavior
Locomotive scroll places the scroller element in a fixed position and alter CSS transform values on that element. ScrollTrigger, however, is based on the scroll top of the browser and we would be discussing how it was implemented as well.
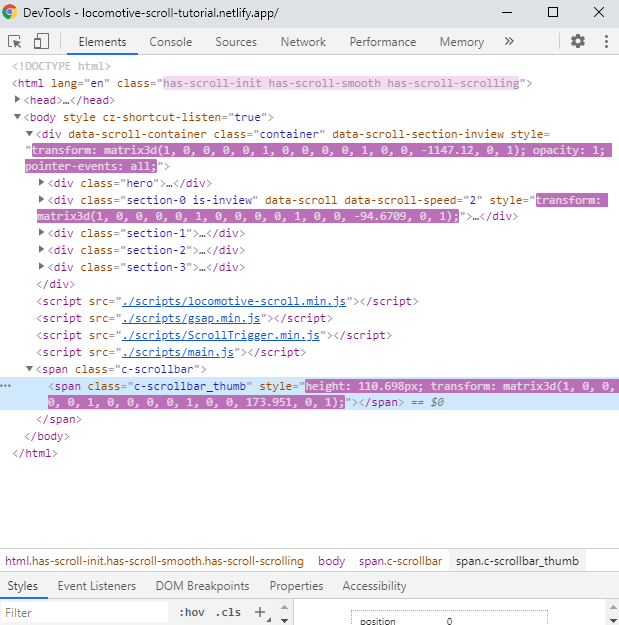
After we open the dev tools as seen above, we see that Locomotive Scroll adds a few classes an elements to the DOM tree. They are
has-scroll-initandhas-scroll-smoothwhich are injected into the html root element on initializationhas-scroll-scrollingwhich is added to the html root anytime the document is being scrolledmultiple inline style transforms to move elements
span.c-scrollbar_thumbwhich is the draggable element that acts as a proxy to the native browser scroll bar.
Creating an Instance
const scroller = new LocomotiveScroll({
    el: document.querySelector('[data-scroll-container]'),
    smooth: true
})
The code snippet above is actually most of the JavaScript needed to initialize Locomotive Scroll in you project. However, because we're incorporating ScrollTrigger, we would need to add some more code to it later on.
There's a list of attributes that are possible to use on the DOM elements to acheive different features and only a few of them were used here. A full list of them can be found on the official github repo. The ones that are used in this project include
data-scrollwhich detects if an element is in view. It's necessary for all the elements we would be manipulatingdata-scroll-containerdefines the scroll container and is needed for basic stylingdata-scroll-speeddefines the element parallax speeddata-scroll-directiondetermines the parallax direction, whether vertical or horizontaldata-scroll-stickywhich fixes the node in place whiledata-scroll-targetis in view
Sections
Hero Section
The Hero Section has a div.copy with data-scroll-speed="3" which makes that div move times as fast while it's scrolling in or out of view.
Section 0
Section 0 shows the possibility of nesting parallax elements on different axes and different directions on the horizontal axis. The two p tags have a data-scroll-direction="horizontal" and the data-scroll-speed set to either -2 or 2 to move the elements left or right respectively. Their parent element also has a data-scroll-speed="2" to move the entire section at twice the speed.
Section 1
Section 1 has a single element that has it's background image size animated on scroll based on the current scroll position.
The comments in the JS file describe what's going on. However, if you would like a deeper dive into how ScrollTrigger works, I encourage you to have a look at their documentation here. They also have a video explaining .scrollerProxy in detail.
Section 2
Section 2 is made up of a 2-column grid with a quote to be pinned and the calculations in the CSS file ensure that both columns have equal heights.
The first column is a div#pinSection that wraps around a blockquote. This blockquote is the node that's going to stick to the top of the viewport for the entire height of it's parent div which is the same as the .images-container's height. Locomotive Scroll is able to detect the intended behavior because of the data-scroll-sticky and data-scroll-target="#pinSection" which tell the blockquote to stick as long as it's parent is in view.
Section 3
Section 3 is quite similar to the hero section and you could refer to it
Conclusion
Well congrats for making it this far, I hope you learnt something new. If you get to make anything, I would love to see it, you could tweet me


